Completing a Work Order
Outcomes: Gain an understanding of how to complete an assigned Work Order.
Prerequisites: The Mobile User must be configured with appropriate permissions (i.e., Mnt Technician)
The following steps outline how a Maintenance Technician can search for Work Orders assigned to them, update information on the Work Orders, and complete the Work Order once the required Maintenance task(s) are complete.
Step 1: Search for Work Orders
Users are able to see the assigned work in the TODAY'S WORK section of the Homepage and any overdue work will show up in OVERDUE WORK section as shown below:
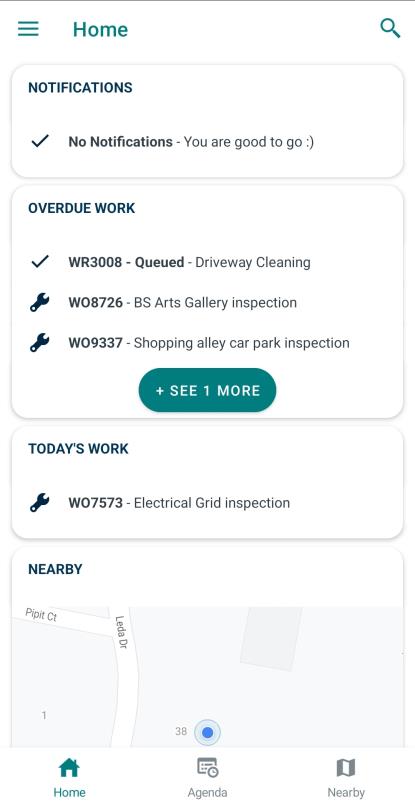
Users are also able to see these Work Orders in the Work Order tab via the Hamburger ( ) icon.
NOTE The user can also find work orders by Location by selecting the Nearby( ) button at the bottom right hand side of the Homepage. This may be useful to identify all similar work on a geographic location to minimize travel between jobs.
Step 2: Review / Update Work Order Details
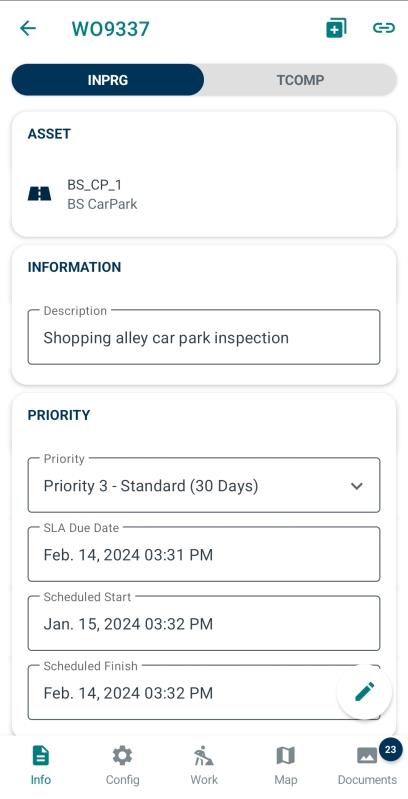
Once the Work Order is selected (By Map, Agenda or Work Order Screen), it will open in the "Info" tab.
To modify or update information on the Work Order, select the Edit button in the bottom right-hand corner.
After clicking the Edit button, users can either use the Import from JP function by clicking this button ( ) or can manually access and update these 5 tabs:
-
Info: This contains the asset, description of work required, comments, a map showing the defect (or asset) location, schedule dates, and priority.
-
Config: This contains the Work Type, and the Failure, Cause, and Remedy Codes. The Cause and Remedy codes should be reviewed to ensure they are correct prior to completing the Work Order as this is critical information when reviewing an asset's performance history to ensure its management / maintenance strategy(s) is / are correct.
-
Work: This contains the Tasks, Services, Materials, and Work.
-
Map: This opens the map in full screen and allows for the defect location to be moved if required.
-
Documents: All photos and associated documents will be shown here and can be opened if the device you are using supports the document type. Additional photos can be added during maintenance such as a before and after maintenance photo.
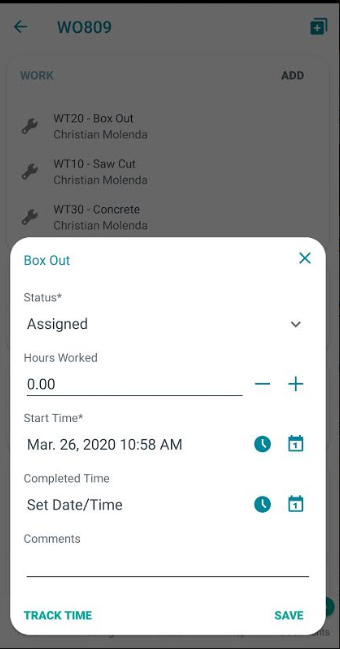
Step 3: Complete Work
In the "Work" tab, for each work task, open by selecting each assigned to yourself. Change the Status from Assigned to Complete, update the Hours Worked on the task and the Start / Complete times. Click the save button when the task is complete. Enter any comments as required.
Step 4: Save and Synchronize Work Order to Assetic Cloud
Once all work tasks are complete, the Work Order will need to be synchronised to the Assetic Cloud. To do this, click the save icon as shown below.

A pop-up box will appear as shown below. If users are satisfied that all the required information has been completed on the work order then select "Complete". This will synchronise the work order back to the Assetic Cloud.
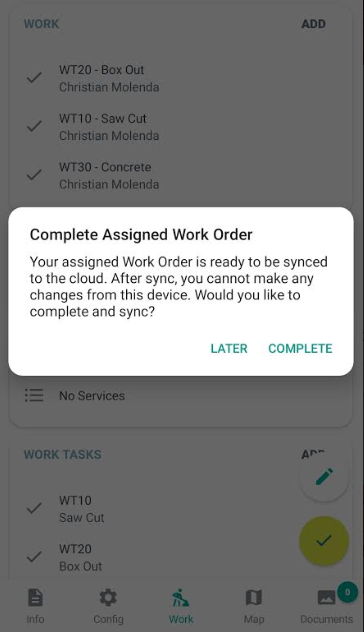
The Work Order is now complete and will have the status of 'TCOMP' meaning the work is technically complete and ready for review by the relevant supervisor.
